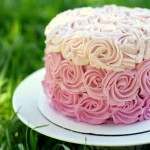
My #1 question since posting about the all natural ombre frosting (click here to see how I dyed it without artificial coloring) was “HOW did you do that?!”
I made another whole cake just so I could show you. (I know, the sacrifices we food bloggers make.) I used Sweetapolita’s fluffy vanilla cake, which made 3 6-inch layers and used about 3 batches of my vanilla buttercream frosting.
It’s really not that hard to do – once you get the swirl technique down you can make frosting roses on anything. All you’ll need is disposable piping bags or reusable piping bags, Wilton 1M tips (or another open star tip), and, of course, a cake and some frosting. The technique is really easy to fix – if you mess up a rose, you just wipe it off and frost it again.
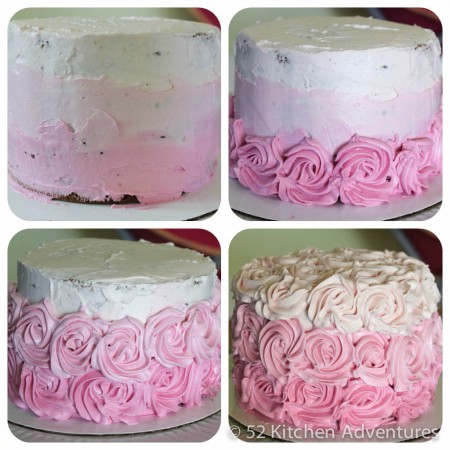
Divide your frosting into 3 bowls, saving a little for the crumb layer and putting a little extra in for the lightest color. Frost the entire cake with a thin crumb layer, then if it’s warm in your house you can place it in the fridge or freezer while you prep the rest of the frosting. Using food coloring (or a natural food coloring like beet juice), add a little to each bowl and mix thoroughly until you have 3 shades that are progressively darker.
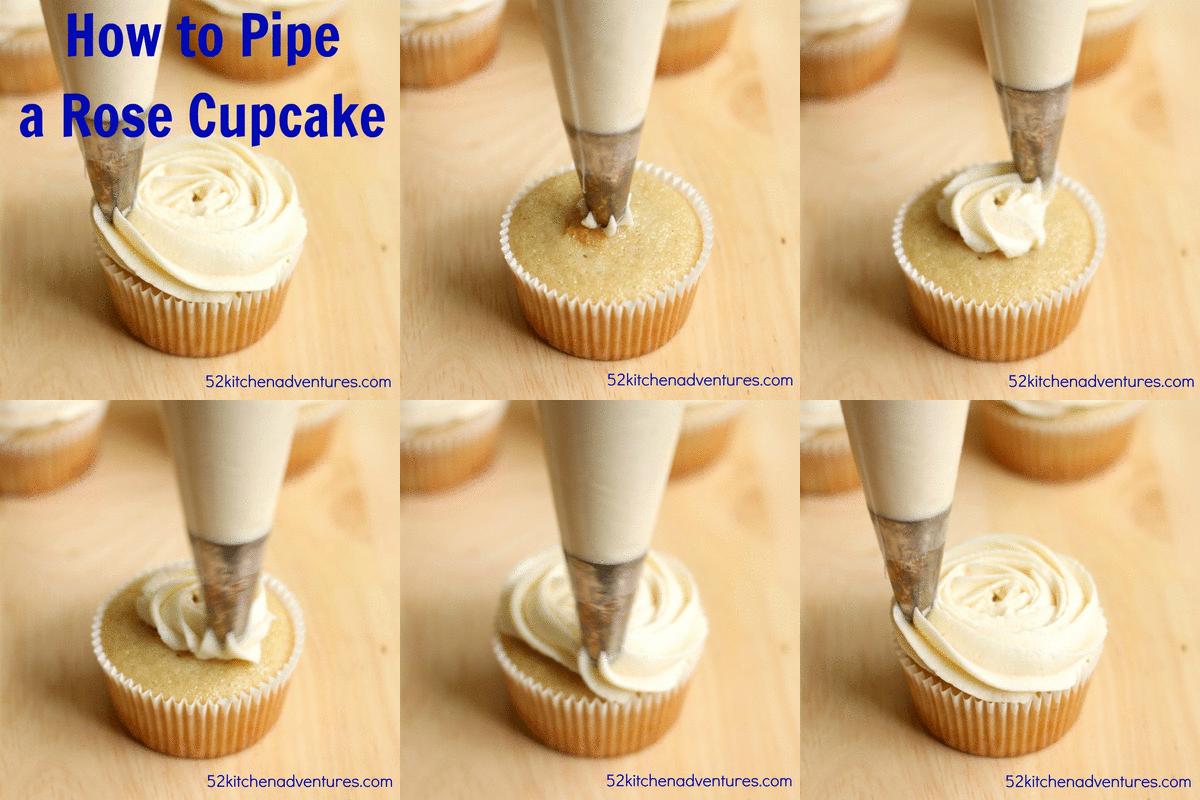 This gif shows how to frost a rose on a cupcake. The same technique applies to a cake.
Load up 3 pastry bags with each color of frosting, fit with your open star tip, and start at the top of the cake. To pipe a rose, hold the piping bag perpendicular to the surface and start in the center of where you want your rose. Gently squeeze the bag and pipe frosting around in a spiral until you reach the outer edge, then let go.
Cover the entire top of the cake and the upper 1/3 of the sides with roses in the lightest color. Move to the next row, using your medium color to pipe roses all around. Finish the bottom 1/3 of the cake with roses in the darkest color. I found the hardest part to be the top edge of the cake, but don’t worry – if you mess one up, just wipe it off and try again.
I’ve been told this frosting tastes like marshmallows and vanilla ice cream. It’s my go-to vanilla frosting recipe. I usually use vanilla bean paste in place of vanilla extract, but that puts black flecks in the frosting, which I didn’t want for this cake.
You’ll need 3-4 batches to frost a 3 layer 6-inch cake with roses.
Ingredients
- 1 stick (1/2 cup) unsalted butter, at room temperature
- 1.5 cups powdered sugar, sifted
- 2 teaspoons vanilla extract (I use Nielsen-Massey Vanilla Extract )
- Beet juice for coloring (optional)
Instructions
- Beat the butter for a few minutes. Add the powdered sugar and beat on medium speed for several minutes, until the frosting becomes smooth and creamy. Add vanilla extract and beat until fully incorporated.
- If using, add beet juice and mix until you reach your desired pink color.
Notes
https://www.52kitchenadventures.com/2012/08/30/how-to-frost-an-ombre-rose-cake/
Note: I Am Baker created the original Rose Cake. See her video tutorial here.
More recipes you’ll love:
39 Comments on How to Frost an Ombre Rose Cake
9Pingbacks & Trackbacks on How to Frost an Ombre Rose Cake
-
[…] Wednesday, 22 August 2012 TweetWelcome to 52 Kitchen Adventures, your one-stop shop for creative and mouth-watering desserts! See my Recipe Index for over 200 recipes. Don't want to miss another recipe? Subscribe via RSS or email.Edited 8/31/12: See a video tutorial on how to frost a rose ombre cake here. […]
-
[…] cupcake liners, vanilla cake and dark chocolate cake (see links below for the recipes I used), vanilla buttercream frosting, and zebra print sugar […]
-
[…] White Cake : Thanks to SprinkleBakes for a moist White Cake Recipe! Swiss Meringue Buttercream: Great SMB recipe from Smitten Kitchen Lychee Filling: Adapted this Lychee Mousse filling from Raspberri Cupcakes Color Styling: Inspired by 52 Kitchen Adventures‘ similar ombre version […]
-
[…] White Cake : Thanks to SprinkleBakes for a moist White Cake Recipe! Swiss Meringue Buttercream: Great SMB recipe from Smitten Kitchen Lychee Filling: Adapted this Lychee Mousse filling from Raspberri Cupcakes Color Styling: Inspired by 52 Kitchen Adventures‘ similar ombre version […]
-
[…] Top 3 things on my blog bucket list for this year are…. 1. Make more how-to videos like my how to frost a rose ombre cake video 2. Host a Google+ hangout on air with a cooking demo 3. Learn to make the perfect pie […]
-
[…] searched online for some inspiration photos. I found lovely examples of buttercream rose cakes at 52kitchenadventures.com and adventuresinsavings.com. So […]
-
[…] and has a bright personality. So I Googled “rose cake” to get ideas. I found this lovely rose cake where the icing was dyed with beet juice. That sounded like so much fun I had to try […]
-
[…] since starting this journey. For instance, in addition to Wilton, I used Country Cleaver and 52 Kitchen Adventures as my main guides for learning the ombre rosette […]
-
[…] Easier than it looks! How to frost an ombre rose cake http://www.52kitchenadve… […]


Annie
August 30, 2012 at 7:17 pm (13 years ago)Awesome! Now I’ll be more comfortable doing it myself! Thanks!
Stephanie
August 31, 2012 at 4:34 pm (13 years ago)@Annie – that’s great! I’d love to see what you create using this technique.
Tamara
August 31, 2012 at 3:07 pm (13 years ago)Awesome tutorial!! Rose cakes are so beautiful.
Tamara recently posted Revolution Doughnuts
Stephanie
August 31, 2012 at 4:34 pm (13 years ago)@Tamara – thanks! They are gorgeous and easier than you’d think!
Laura (Tutti Dolci)
August 31, 2012 at 6:21 pm (13 years ago)Seriously gorgeous cake! Great video tutorial too
Laura (Tutti Dolci) recently posted roasted strawberry-peach bars
Stephanie
August 31, 2012 at 8:38 pm (13 years ago)@Laura – thanks! It’s a little weird to hear/see myself on video, but I hope everyone enjoys it
Anna @ hiddenponies
August 31, 2012 at 10:03 pm (13 years ago)Such a stunning cake, and great idea with the video, you make it seem totally doable!
Anna @ hiddenponies recently posted Sweet & Savoury Pork Pizza
Stephanie
September 1, 2012 at 10:15 am (13 years ago)@Anna – thanks! It’s a lot easier than it looks, I promise
Yudith @ Blissfully Delicious
September 1, 2012 at 4:56 pm (13 years ago)What a gorgeous cake. And thanks for the tutorial.
Yudith @ Blissfully Delicious recently posted Bread and Butter Pickles
Stephanie
September 1, 2012 at 7:35 pm (13 years ago)@Yudith – thanks! I love making tutorials and breaking down projects like this for everyone. It’s my first video and I can’t wait to make more.
Anne@FromMySweetHeart
September 1, 2012 at 8:56 pm (13 years ago)Stephanie…..that was such a wonderful video and tutorial! I love that ombre look…and I’ve actually been looking to learn how to decorate a cake in that rose pattern completely in white. I think that technique has such a vintage look and feel to it! Your cake turned out beautifully and I thank you for teaching me. I can’t wait to give this a try! : )
Anne@FromMySweetHeart recently posted Mango Coconut Cream Puffs with Mango Mojito Sauce
Stephanie
September 1, 2012 at 9:16 pm (13 years ago)@ Anna – I’m so glad you enjoyed my video! A rose cake in white would look lovely. I can’t wait to see what you come up with! Feel free to leave a link and/or photos on my Facebook page.
Sarah
September 4, 2012 at 10:43 am (13 years ago)Fantastic tutorial, thank you for the inspiration. Just found your blog for the first time and wanted to say hi – love it!
Sarah recently posted Tea Fuel
Stephanie
September 4, 2012 at 4:27 pm (13 years ago)@Sarah – thanks for stopping by! So glad you like my tutorial and blog
Cake Baking Kate
September 6, 2012 at 12:30 pm (13 years ago)Oh you make that look so easy, and it certainly looks yummy! What a great tutorial. I’m going to try this on the next cake I make. Thanks!
Stephanie
September 6, 2012 at 12:33 pm (13 years ago)@Cake Baking Kate – it really is that easy! I can’t wait to see what you make
Beth
September 7, 2012 at 8:10 pm (13 years ago)Beet juice? How – drained from a can of beets?
This is something I want try for a special birthday in a couple months. It ends up so impressive looking but I think even I can do it! Thanks!
Beth
September 7, 2012 at 8:13 pm (13 years ago)oops…I just discovered where you’d written the instructions for how to colour the frosting. Too easy!
Stephanie
September 9, 2012 at 9:15 pm (13 years ago)@Beth – isn’t that simple? In case anyone else missed it, click here for the pink ombre frosting recipe without food dye!
Alicia
October 11, 2012 at 1:02 pm (13 years ago)I attempted to do this for my daughter’s smash cake session but my roses were melting, I used brand new frosting from Duncan Hines idk what I did wrong?
Stephanie
October 11, 2012 at 2:27 pm (13 years ago)@Alicia – I recommend making your own frosting for this. Most store bought frostings will be too soft and won’t hold up the shape of the roses. Try making a simple buttercream – the one in this post is my favorite vanilla buttercream. I used about 3 batches of that to frost a 3-layer 6″ cake with roses.
Beth @ Decadent Dragon Bakery
December 12, 2012 at 9:50 pm (12 years ago)Thank you for the inspiration! I made a similar pink and gold version recently. It turned out beautifully.
Beth @ Decadent Dragon Bakery recently posted Lychee Ombre Rose Cake
Stephanie Nuccitelli
December 12, 2012 at 10:30 pm (12 years ago)Your cake is beautiful, Beth! I love the addition of gold at the top.
vicki
July 24, 2013 at 1:29 pm (12 years ago)great tutorial for a beautiful cake!
do you think this frosting would hold up on a cake that has to sit in the sun(outdoor wedding in august-eek) for about 2 hours?
Stephanie Nuccitelli
July 24, 2013 at 8:48 pm (12 years ago)Vicki, I don’t know how hot it is where you are, but I don’t think this frosting will hold up in direct sun outside for 2 hours. Butter has a lower melting point than shortening, so I’d make a buttercream with shortening if you want to do a design like this. I’d try to keep it inside or at least in the shade until serving too. It may dry out a bit, but perhaps you could freeze it first so it won’t totally melt. Good luck!
vicki
July 25, 2013 at 2:19 pm (12 years ago)ooh, good point about the melting point. thanks.
Wisconsin outdoor wedding…so it could be 70 but more likely 90degrees or so in august. i’m still trying to convince her to keep the food in the tent or an awesome old barn ont he property but so far no luck.
thanks!
Sarah
November 2, 2013 at 7:44 am (11 years ago)Ok but how do you get your cake layers to fit together so perfectly? My cakes always have big gaps on the side between the layers when I stack them.
Eliza
August 23, 2014 at 10:02 pm (11 years ago)I made my first Ombre Rose cake today using your tutorial and recipes. I even used the beet juice for color. It was for a garden party baby shower and it turned out lovely! It was admired by all. Thank you for your inspiring post.
Linda Lloyd
July 14, 2015 at 10:31 am (10 years ago)Can you please tell me what tip you used for the roses??
Stephanie Saunders
July 21, 2015 at 10:11 am (10 years ago)You can use the Wilton 1M or 2D (or any large open star tip) to make the roses.