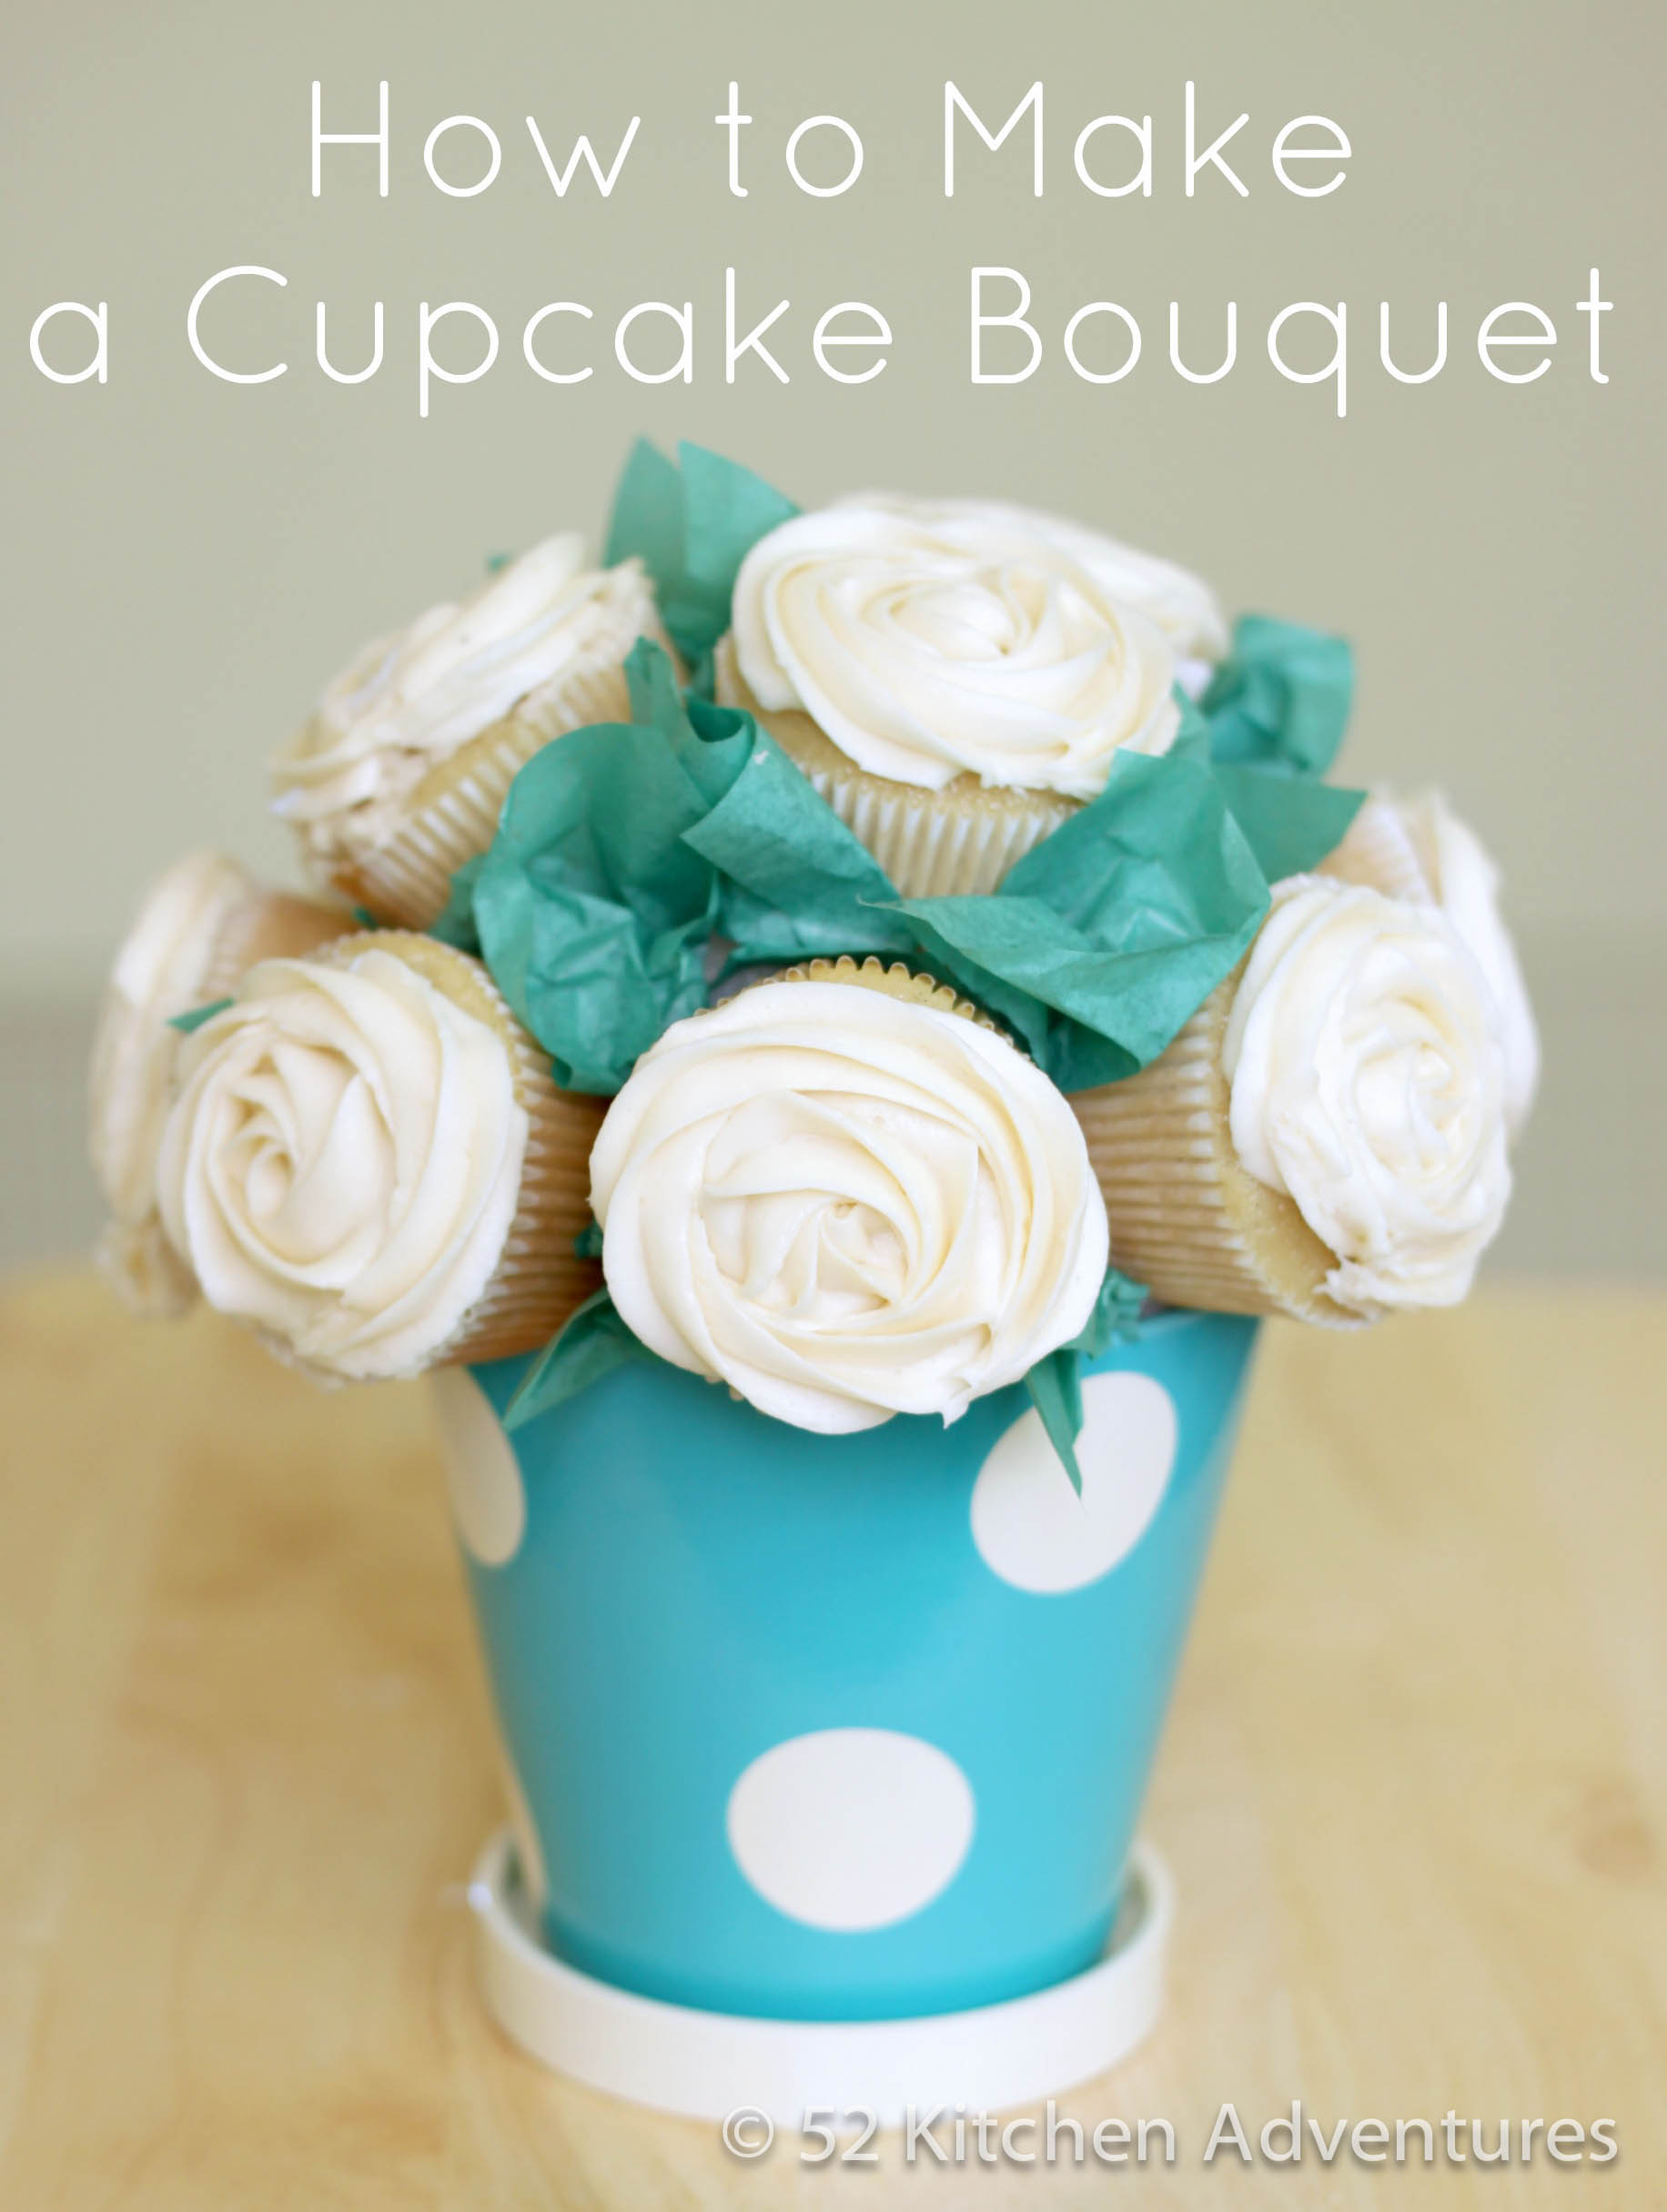
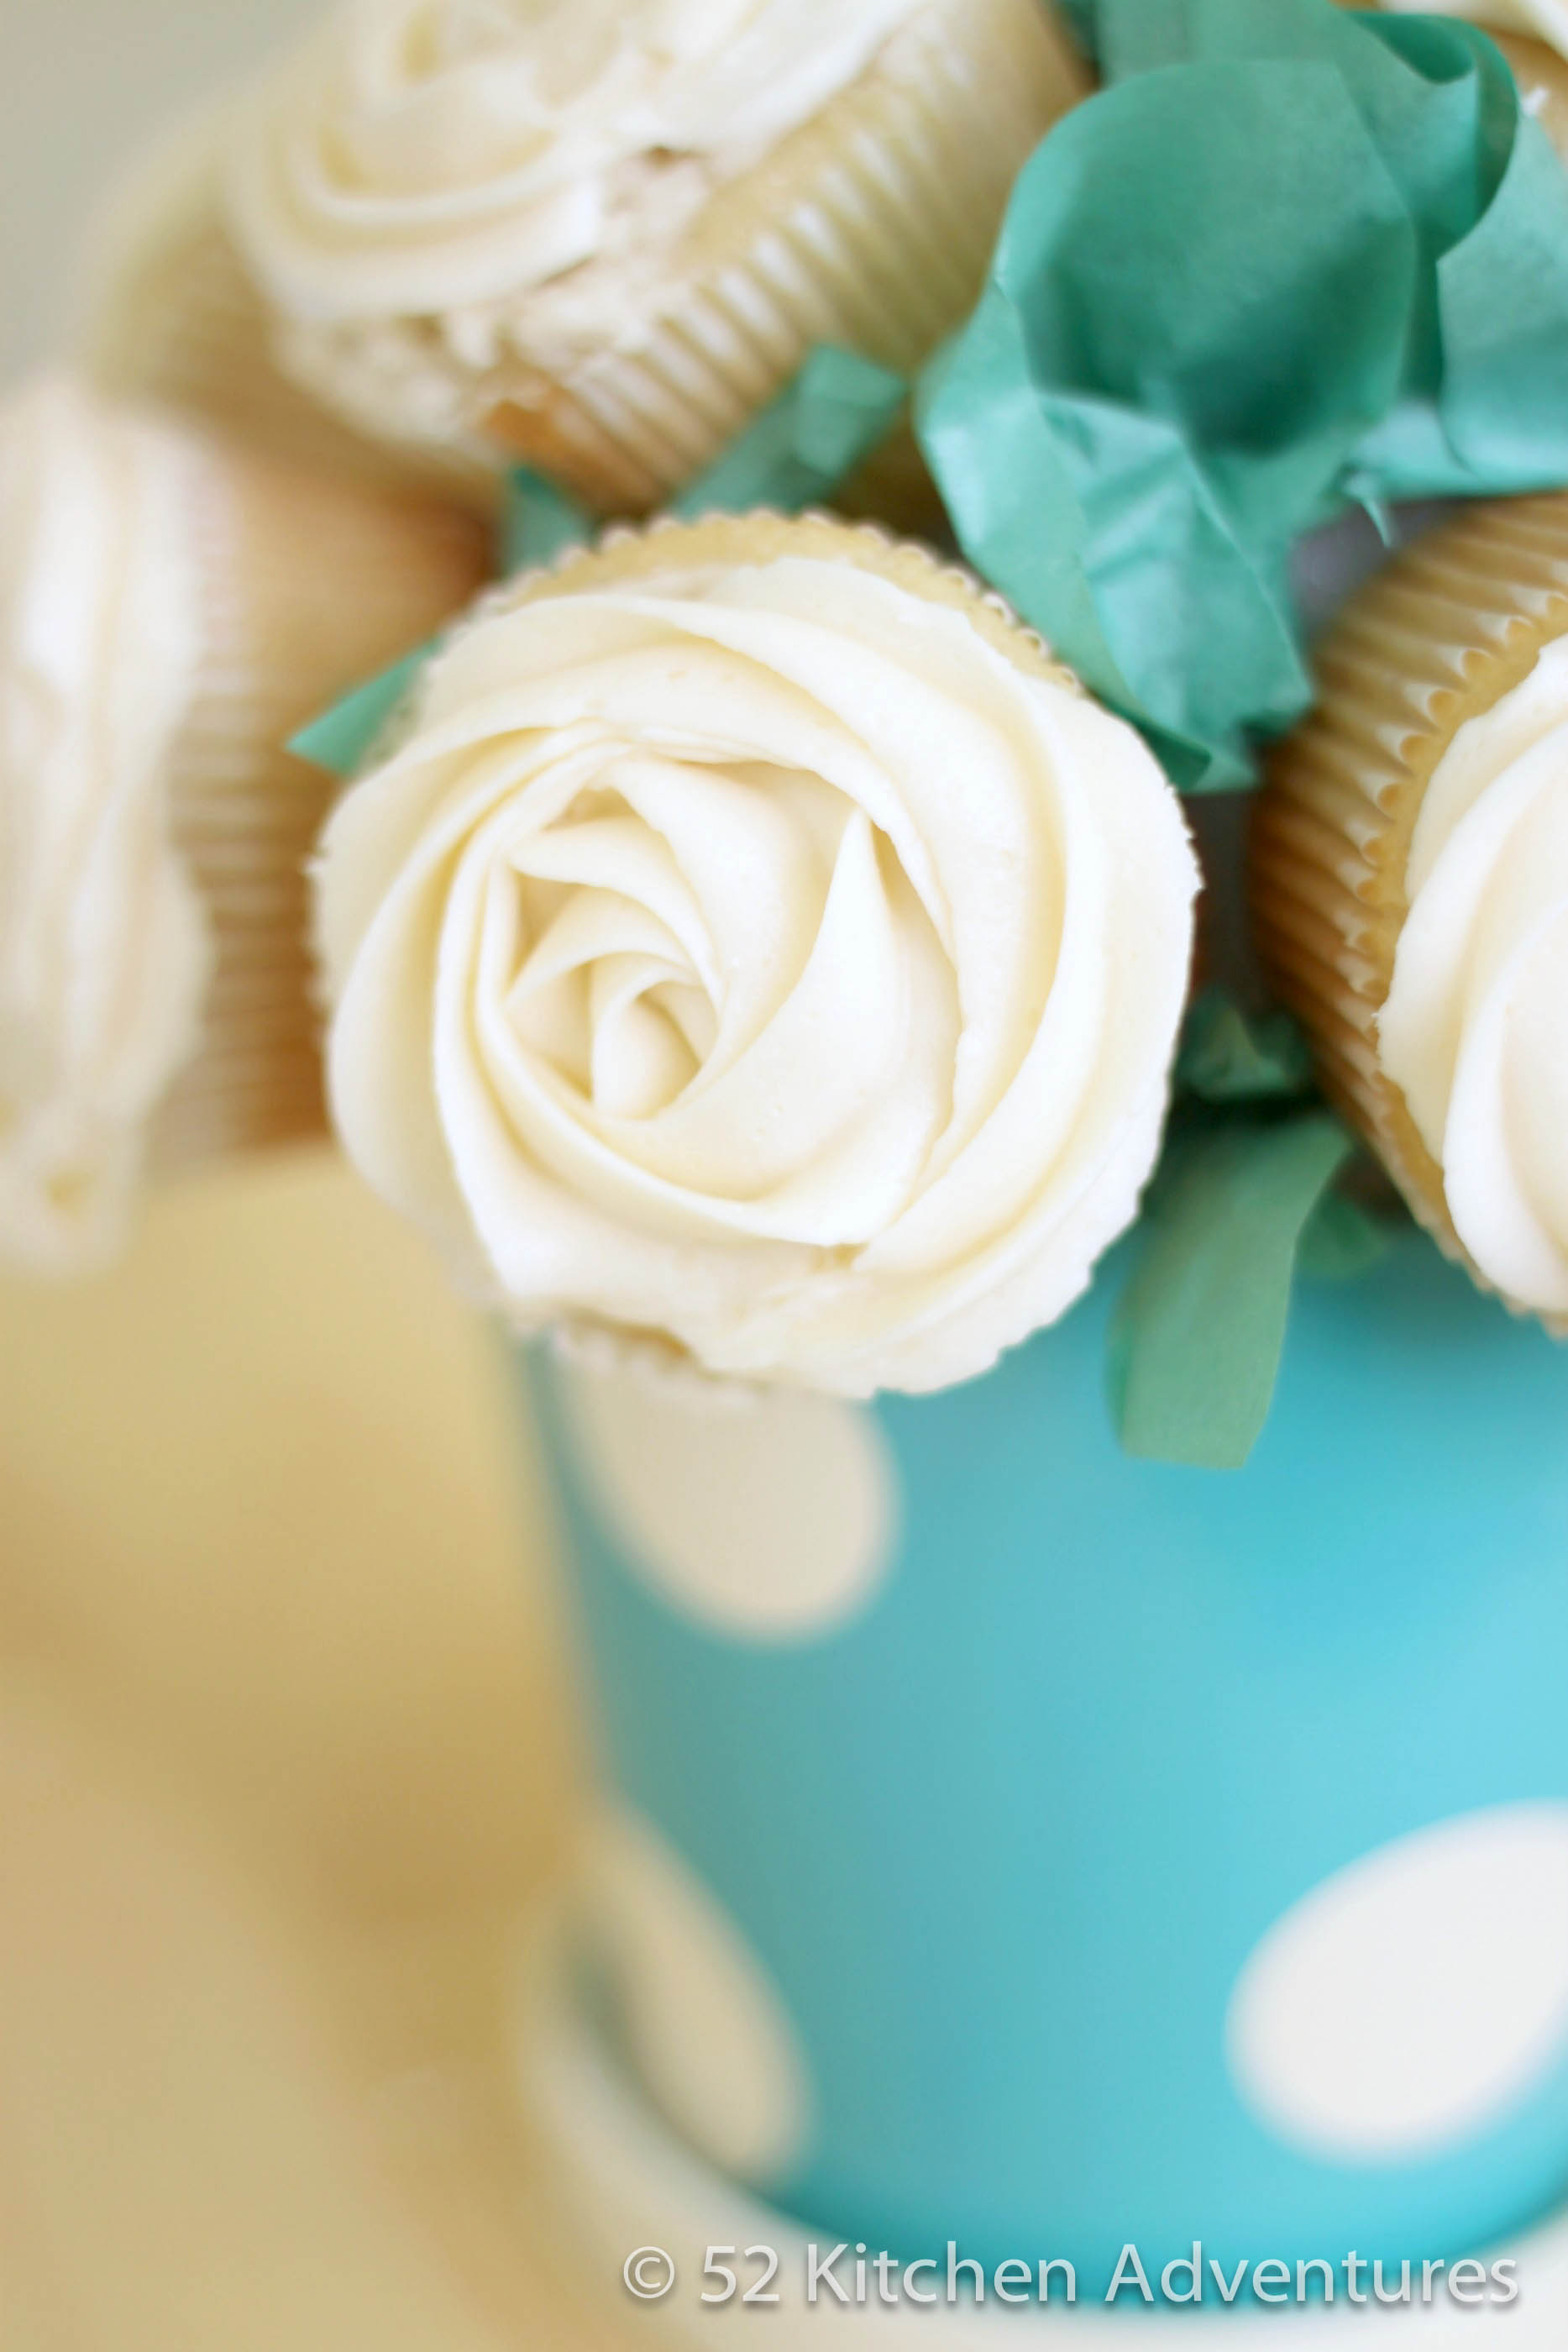
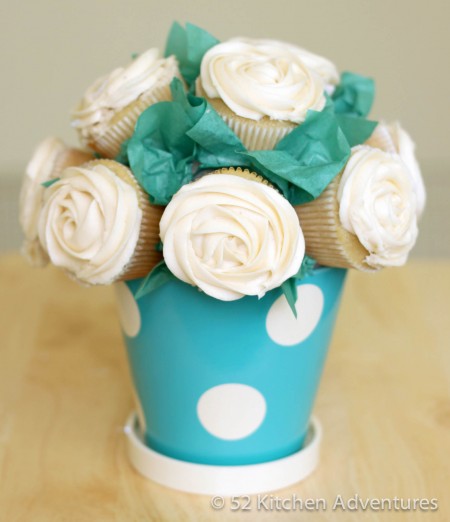
Oh, how I love Pinterest. It’s such a fun source for inspiration and new ideas. Someone pinned a cupcake bouquet and I knew right away that I had to create one myself. I couldn’t find any good guides on making them, so I put together a step by step photo tutorial for you so you can make one too. It’s really not that hard – pipe roses onto cupcakes (there’s an animated gif below to show you how), put them on some toothpicks into a styrofoam ball. Done!
I think a cupcake bouquet would be a lovely gift for Mother’s Day, which is coming up in two weeks. It would work for so many other occasions too – bridal showers, baby showers, birthdays, as a get well gift, or just as a pick-me-up for a friend who needs a smile (and tasty treat). This is the first one I’ve made and I love how it turned out, except I want to experiment with the fake leaves – I used tissue paper but I’m wondering if I can use real leaves somehow. I will try that out next!
For the cupcakes, I used Cupcake Project’s ultimate vanilla cupcake and vanilla bean buttercream (I substituted vanilla extract for bean in the frosting so it wouldn’t have flecks in it), which were met with rave reviews:
“As a chocolate person, I think of vanilla as a nothing flavor but this…this has a distinct flavor!”
“I hate frosting but this is great.” “The frosting isn’t too sweet.” “The frosting does taste like melted vanilla ice cream!”
Seriously, I can’t recommend these recipes enough: the cake is fluffy with a nice vanilla flavor and the buttercream frosting pipes perfectly and tastes like melted vanilla ice cream.
Who would you give a cupcake bouquet to?
How to make cupcake bouquets:
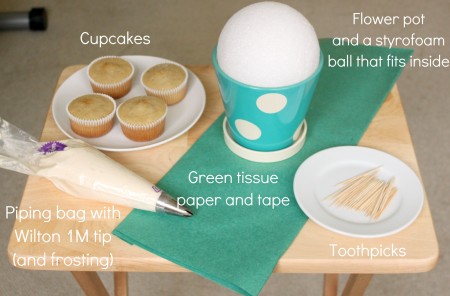 You’ll need: cupcakes, frosting, a disposable piping bag or a reusable piping bag
, Wilton 1M tip
(or a similar open star tip), green tissue paper, clear tape, flower pot, styrofoam ball, and toothpicks. All of these things are available online or at craft stores such as Michael’s (that’s where I found the adorable polka dot flower pot).
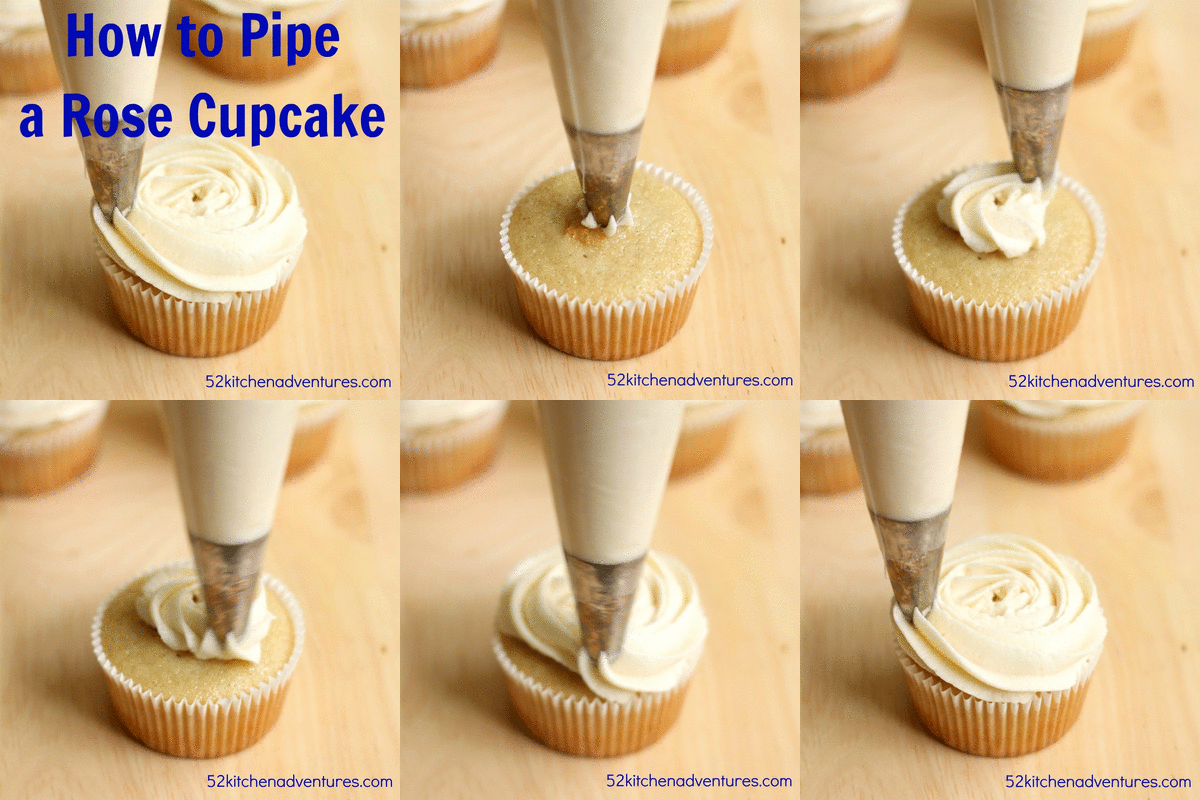 Bake cupcakes and make buttercream frosting. To pipe a cupcake rose, fit a piping bag with a 1M tip and fill with room temperature frosting. To pipe a rose, hold the piping bag perpendicular to the surface and start in the center of the cupcake. Gently squeeze the bag and pipe frosting around in a spiral until you reach the outer edge, then let go.
Place cupcakes in fridge while you prepare the styrofoam so the frosting becomes firm.
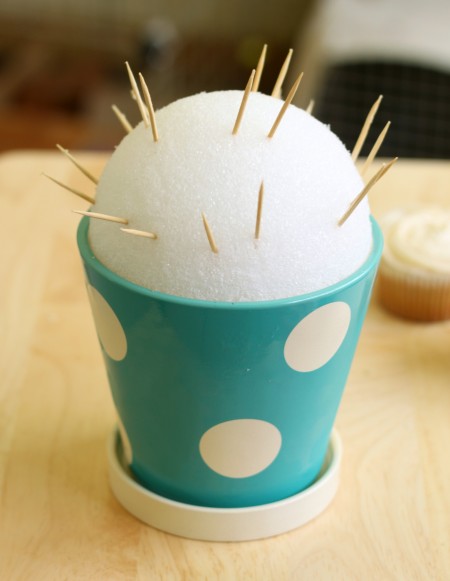 Place styrofoam ball into flower pot. Place two toothpicks in each area where you want a cupcake. Note: around the sides, insert toothpicks at 45° angle, otherwise cupcakes will fall off after a while.
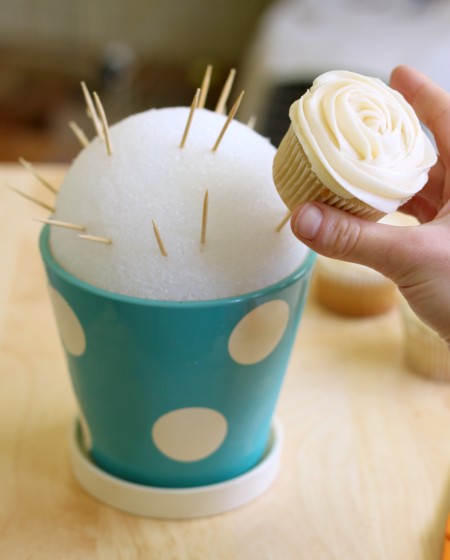 Slide a cupcake onto each pair of toothpicks, adjusting toothpicks as needed to place cupcakes close together. Cover as much of the styrofoam as you can. (My styrofoam ball had a 5″ diameter and fit 10 cupcakes.)
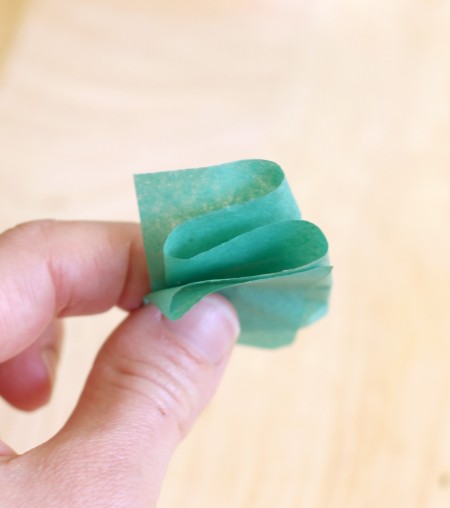
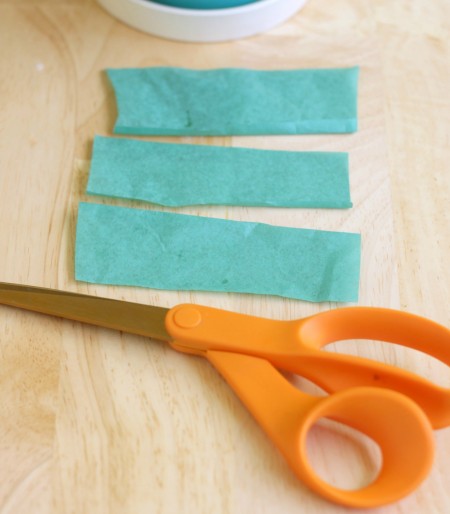 Cut green tissue paper into small strips.
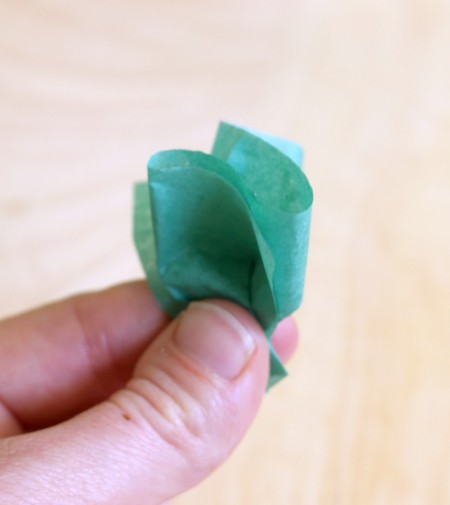 Pinch the bottom of the accordion fold
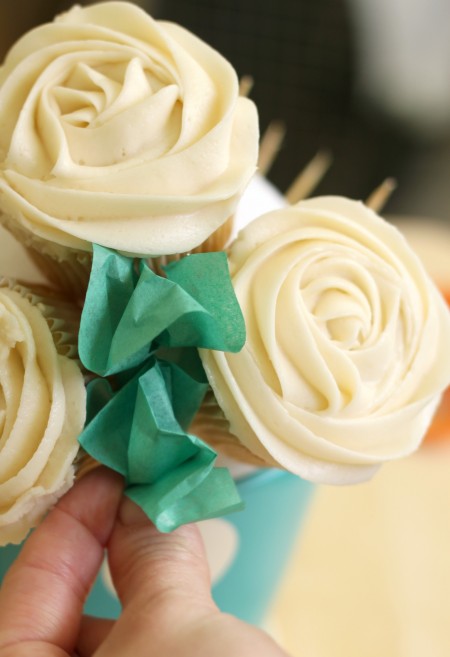 Place a piece of clear tape at the pinched part of the tissue paper and stick it to the exposed styrofoam in between the cupcakes. Make more tissue paper “leaves” until you cover all the uncovered areas.
And you’re done! Bring your cupcake bouquet to your next birthday party, baby shower, Mother’s Day, bridal shower…the possibilities are endless!
More recipes you’ll love:
220 Comments on How to Make a Cupcake Bouquet
80Pingbacks & Trackbacks on How to Make a Cupcake Bouquet
-
[…] up is an adorable cupcake bouquet. There are so many great elaborate ones online (seriously you should search it in Pinterest, […]
-
[…] 52 Kitchen Adventures shares a step-by-step tutorial for transforming these “ingredients”, into . . . Here’s what you’ll need to make a Cupcake Bouquet. […]
-
[…] browsing through Pinterest, I found a great tutorial from 52 Kitchen Adventures of how to make a Cupcake Bouquet. What a wonderful idea! While this would’ve been perfect for Mother’s Day, it still […]
-
[…] speaking of cupcakes, how impressive is this cupcake bouquet? Listen up, boys – this beats flowers any […]
-
[…] up that requires my attention! Sorry!). For now, here’s another DIY tutorial, courtesy of 52 Kitchen Adventures that I think will be great as a table decor. The cupcake bouquet will save you having to come up […]
-
[…] boy/girl has a super sweet tooth like me, a cupcake bouquet like this one by Stephanie from 52 Kitchen Adventures will be great. She put it all together with a flower pot, a styrofoam ball, toothpicks, some tissue […]
-
[…] Kevin bought me flowers on Mother’s Day, so I wanted to give him some fancy cupcakes for his day. A few months ago I had seen this on Pinterest (via 52 Kitchen Adventures)… […]
-
[…] Board:How cute would a bouquet of cupcakes be on a table at a party? LOVE it! Source: 52kitchenadventures.com via Mandy on […]
-
[…] técnica, que é bem simples.Tutorial de como fazer um cupcake ITutorial de como fazer um cupcake IITutorial de como fazer um cupcake IIIFotos de buquês de cupcakesPara ver a galeria de buquês, clique na primeira imagem abaixo e depois […]
-
[…] just how much you care for someone and they appreciate it. (giveaway information below). Thanks to Kitchen Adventures for the inspiration behind this […]
-
[…] 3. Always wondered how to make a cupcake bouquet? 52 Kitchen Adventures got you covered! A gorgeous and easy to follow photo tutorial. […]
-
[…] say I’ll still leave the outer tissue paper off, and use a taller container (like they use at 52 Kitchen Adventures). So you can use whatever frosting you […]
-
[…] a cake, color fading from dark to light is so pretty. Combine that with the rose frosting technique and you get a truly breathtaking cake. This one is a show stopper, and it isn’t that hard to […]
-
[…] I love fresh cut flowers, but if I keep them in the house I have to eat a handful of Benadryl in order to cope. But you know what I'm not allergic to? Cupcakes! Stephanie from 52 Kitchen Adventures arranged an assortment of them into this fun bouquet that would look phenomenal on any buffet table or dessert spread. By using different colored flower pots, frosting, and even cupcake liners, you can customize this project to work for anything from a baby shower to the office Christmas party. [how to make a cupcake bouquet] […]
-
[…] read this post about making a cupcake bouquet: http://www.52kitchenadventures.com/2012/04/29/how-to-make-a-cupcake-bouquet/. It teaches you how to make a vase full of cupcakes. When I first saw a picture of the cupcake […]
-
[…] cupcake bouquet? Well 52 Kitchen Adventures has shared step-by-step instructions on how to make a cupcake bouquet. There’s even a video tutorial on how to make the beautiful cupcake rose from frosting. These […]
-
[…] Una volta pronti ho cominciato a fissarli al polistirolo usando 3 stecchini per ogni cupcake partendo dal basso, alla fine ce ne sono stati sette in un vaso di diametro 12 cm, io ho infilzato prima gli stecchini nel polistirolo e poi ho premuto sopra il cupcake. Io non ho fatto foto della preparazione, perchè come al solito mi agito (in genovese direi mi invexendo) e fare le foto mi passa di mente, ma trovate un buon esempio qui […]
-
[…] http://www.52kitchenadventures.com/2012/04/29/how-to-make-a-cupcake-bouquet/ Share this:TwitterFacebookLike this:LikeBe the first to like this. […]
-
[…] #2 most popular post ever is How to Make a Cupcake Bouquet. This is one my personal favorites as well, along with my pink ombre rose cake. Rose frosting just […]
-
[…] just looking at the Rose on each cupcake it seems complicated to make, but here you can see another tutorial on how to pipe a rose cupcake (it seems very easy to […]
-
[…] decorating and some of the most adorable dessert treats you have ever seen! I love her post on making a cupcake bouquet or how to make your own cupcake […]
-
[…] Make a cupcake bouquet […]
-
[…] Make a cupcake bouquet […]
-
[…] way to showcase your cupcakes to be the center of attention – turn them into an eye catching cupcake bouquet! All you need are plastic cupcake holders, toothpicks, a Styrofoam ball and a decorative bucket or […]
-
[…] after, my friend who was in charge of the shower preparations, found some ideas on Pinterest for cupcake bouquets and a cupcake wedding dress. She asked if I could make something similar with my cupcakes for the […]
-
[…] How to Make a Cupcake Bouquet Funfetti Cupcakes from Scratch Homemade Salted Caramel Mocha […]
-
[…] To how to make a cupcake bouquet… […]
-
[…] tolle Idee, nämlich ein Blumenstrauß aus Rosencupcakes! Einen sehr schönen und anschaulichen Artikel gibt es bei Stephanie von 52 Kitchen Adventures (auf Englisch). © 52kitchenadventures.com Auf das […]
-
[…] You can find out how to make it here 52kitchenadventures […]
-
[…] que os haya gustado! Lo hemos encontrado en 52 Kitchen Adventures, web a la que pertenecen las fotografías. Etiquetas: DIY […]
-
[…] Cupcake Bouquet – Super cute. A tutorial can be found […]
-
[…] photo credit: 52 kitchen adventures […]
-
[…] 39. Cupcake Bouquet […]
-
[…] 25. Make Your Own Cupcake Bouquet […]
-
[…] Cupcake Bouquet from 52 Kitchen Adventures. […]
-
[…] Make a Cupcake Bouquet. Find out how to do it HERE […]
-
[…] Make a Cupcake Bouquet. Find out how to do it HERE […]
-
[…] this will be a great craft to do with Arden – she can stick on the stars and the streamers. 52 Kitchen Adventures As if this cupcake bouquet wasn’t adorable enough on it’s own, Stephanie from 52 […]
-
[…] Cupcake Bouquet | 52 Kitchen Adventures […]
-
[…] 3. Lovely Cupcake Bouquet […]
-
[…] Via 52 Kitchen Adventures […]
-
[…] 7. Cupcake Bouquet- DIY Frosting Tutorial […]
-
[…] How to Make a Cupcake Bouquet – 52 Kitchen Adventures […]
-
[…] make an edible bouquet? It is simpler than you think, and here are some good guides for making one: 52 Kitchen Adventures, Roxy’s Kitchen. Basically, you have to make several cupcakes and some frosting that are then […]
-
[…] I also like finding cute and unique craft ideas for events, and since this issue is all about birthdays, we wanted to find ways to help you showcase those wonderfully delicious cupcakes you just made—or if you’re like me, just bought. So here is a how-to on a cupcake bouquet that I found at http://www.52kitchenadventures.com/2012/04/29/how-to-make-a-cupcake-bouquet. […]
-
[…] this is confusing, just have a look at this post from 52 Kitchen Adventures on how to make a cupcake bouquet, and how to use the same technique to ice a r… Better? Once you’re done here, you should probably go and check out the rest of the awesome posts […]
-
[…] Un bouquet…de cupcakes! (le pas à pas en anglais -mais les images se suffisent à elles-mêmes- sur 52 kitchen adventures) […]
-
[…] Flowers are always nice to receive, however they can sometimes be expensive or not last very long. While this version may not last long either, at least its scrumptious. These make a great gift for a teacher, mother, in-law or friend. You can learn how to create this at 52 Kitchen Adventures. […]
-
[…] Check out tutorial on 52 Kitchen Adventures. […]
-
[…] way to showcase your cupcakes to be the center of attention – turn them into an eye catching cupcake bouquet! All you need are plastic cupcake holders, toothpicks, a Styrofoam ball and a decorative bucket or […]
-
[…] Stalno gledam neke slike po internetu i nedavno sam naišla na bukete od cupcakesa i jednostavno sam morala to sama probati napraviti. Na internetu sam uspjela pronaći super tutorial koji ću podijeliti s vama, mislim da je izvrsno opisano i textom i slikama: How to Make a Cupcake Bouquet […]
-
[…] Cupcake Bouquet – Super cute. A tutorial can be found […]
-
[…] Find the full instructions here. […]
-
[…] Find full instructions at 52 Kitchen Adventures here. […]
-
[…] Cupcake Bouquet: […]
-
[…] Check out How to Make a Cupcake Bouquet […]
-
[…] Cupcake bouquet. You don’t have to give your mother and your guests a real bunch of flowers when you can give them edible cupcake bouquets. […]
-
[…] 52 Kitchen Adventures […]
-
[…] How to Make a Cupcake Bouquet […]
-
[…] a terracotta flower pot (cleaned, of course) and anchor decorated cupcakes via chopsticks. 52 Kitchen Adventures has more on creating a Mother’s Day cupcake […]
-
[…] How to Make a Cupcake Bouquet […]
-
[…] ©52kitchenadventures.com. […]
-
[…] baked a beautiful Cupcake Bouquet on behalf of her and my hubby for mothers Day ? inspired from http://www.52kitchenadventures.com/2012/04/29/how-to-make-a-cupcake-bouquet/ […]
-
[…] Click the link here for the tutorial: Easter Cupcake Bouquet […]
-
[…] to make a Cupcake Bouquet by 52kitchenadventur… at http://www.52kitchenadve… –Beautiful! Use different colors and icing techniques for different looks! Go to the page to […]
-
[…] Image Credit to STEPH […]
-
[…] man einen Cupcake Bouquet von macht 52kitchenadventur … beim http://www.52kitchenadve … –Schön! Verwenden Sie verschiedene Farben und Zuckerguss-Techniken für unterschiedliche […]
-
[…] to make a Cupcake Bouquet by 52kitchenadventur… at http://www.52kitchenadve… –Beautiful! Use different colors and icing techniques for different looks! Go to the page to […]
-
[…] man einen Cupcake Bouquet von macht 52kitchenadventur … beim http://www.52kitchenadve … –Schön! Verwenden Sie verschiedene Farben und Zuckerguss-Techniken für unterschiedliche […]
-
[…] cupcakes de práctica de cuando aún estabas trabajando en clavar esas rosas glaseadas. Consigue el tutorial . 52 aventuras de […]
-
[…] mom some cupcakes baked with love and arrange them into a lovely bouquet for an elegant touch. 52 Kitchen Adventures has a great tutorial to help you get it just […]
-
[…] Cupcake bouquet […]
-
[…] Find the full instructions here. […]
-
[…] Lovely Cupcake Bouquet […]
-
[…] Check out tutorial here. […]
-
[…] Does she have a sweet tooth? Make a yummy Cupcake Bouquet. […]
-
[…] Find full instructions at 52 Kitchen Adventures here. […]




CJ at Food Stories
April 30, 2012 at 11:11 am (13 years ago)This is beautiful and such detailed instructions. Thx 🙂
CJ at Food Stories recently posted Food Story Photos
Stephanie
April 30, 2012 at 6:11 pm (13 years ago)@CJ – thank you! It was fun to make. I’m glad you enjoyed the post 🙂
linda
July 5, 2015 at 6:00 pm (10 years ago)I was asked to make cupcake bouquets for a wedding at the end of the month. It looked so easy. I tried one. Unfortunately, the cupcakes on the side and bottom were sagging and falling off. The frosting even fell off of one. I’m afraid that if it’s a warm day, it would be disastrous. Even with many toothpicks, the cupcakes were sagging. Ideas?!
kalynbrooke
May 7, 2012 at 5:05 pm (13 years ago)So gorgeous! Gonna have to be a reader now. 🙂 Stopping by from Spring Fling.
kalynbrooke recently posted Let the Boring Books Die. Please.
Stephanie
May 9, 2012 at 3:34 pm (13 years ago)@kalynbrooke – thanks! I’m so glad you found me via Spring Fling.
the wicked noodle
May 8, 2012 at 5:43 am (13 years ago)Ever since you told me about this I’ve been dreaming of it!! Pinning now!!
the wicked noodle recently posted strawberry & apple whole wheat cookies
Stephanie
May 9, 2012 at 3:35 pm (13 years ago)@the wicked noodle – thanks for stopping by, Kristy!
fork
May 8, 2012 at 5:33 pm (13 years ago)wow! that’s seriously adorbs!
fork recently posted Sticker Heaven + A Giveaway!
Stephanie
May 9, 2012 at 3:35 pm (13 years ago)@fork – thanks! 🙂
Tiffany
May 11, 2012 at 3:57 pm (13 years ago)This is so beautiful! Perfect for mothers day!
Tiffany recently posted Green Chile Barley Soup
Eileen
May 11, 2012 at 6:17 pm (13 years ago)I love your bouquet! Thanks for sharing 🙂 And yes, I love Pinterest too…
Eileen recently posted Peanut Butter Oatmeal Cookies and Breaking the Rules
Anna
May 21, 2012 at 1:41 pm (13 years ago)Mint leaves would be great for this….luckily for me I have a ton!
Stephanie
May 22, 2012 at 8:56 pm (13 years ago)@Anna – mint leaves are a great idea! I’ll have to try those too. Thanks 🙂
Kristine
March 8, 2015 at 1:54 pm (10 years ago)Maybe some cake pops with leaves frosted on them to fill on the gaps instead of tissue paper?
VERO DE LA CRUZ
May 22, 2012 at 11:13 am (13 years ago)me encantooooooooooooooooooooooooooooooooooo
Maxine
May 23, 2012 at 11:02 am (13 years ago)Stephanie, I think you would change your mind on the vanilla thing if you had the RIGHT vanilla! Mexican vanilla has a TOTALLY different flavor than most, and is BY FAR the most awesome. White Mexican Vanilla, preferably ROOSTER brand, can be bought online, or I have friends bring it from AZ or NM or get it on a cruise. This is the ONLY kind I use, and believe me, its the best. GIve it a try.
Joni Godbout
May 23, 2012 at 2:23 pm (13 years ago)Very cute cupcake display. I can’t wait to make one!
Shey
May 24, 2012 at 9:41 pm (13 years ago)Love this idea! Was wondering if the frosting slipped off the angled cupcakes once it was at room temp?
Jen
May 25, 2012 at 4:23 am (13 years ago)This is gorgeous! Where did you get the lovely plant pot from?? I’m looking for one in just this colour..
Stephanie
May 25, 2012 at 7:01 pm (13 years ago)@Jen – I got the flower pot at Michael’s.
Megan@Whimsically Homemade
May 25, 2012 at 10:07 am (13 years ago)Hey there! Just wanted to let you know we featured you in our Favorite Find Fridays post over at Whimsically Homemade. We used one of your pictures. If that’s a problem let us know and we’ll remove it immediately. Thanks for your great inspiration!
Angela B.
May 27, 2012 at 6:50 pm (13 years ago)THIS IS AMAZING! You make it look SO easy. I would never have thought of this. Can’t wait to try it! Again, AMAZING!
Rebecca Welch
May 29, 2012 at 3:32 am (13 years ago)This is so great! What a lovely idea for wedding decorations, or gifts. Thank you for your easy step-by-step instructions too, you make it so clear and simple.
Cassandra
June 2, 2012 at 12:37 am (13 years ago)How do I transport these??? As soon as they aren’t in the fridge the frosting starts to droop. I am doing 6 for a wedding and I am doubtful they will make it to the event 🙁
Stephanie
June 2, 2012 at 7:09 am (13 years ago)@Cassandra – what kind of frosting are you using? I used a buttercream (link to the recipe is in the post) and had no problem at all with drooping frosting, even after it had been at room temperature for a while.
Lauren
June 15, 2012 at 6:29 pm (13 years ago)This is absolutely brilliant, so creative I love it!
Aneta
June 16, 2012 at 9:16 am (13 years ago)I recently made a cupcake bouquet and it looked great but after an hour or two the frosting on the bottom layer started to slide off. Any suggestions? I made the regular buttercream frosting.
Stephanie
June 16, 2012 at 1:20 pm (13 years ago)@Aneta – did you angle the cupcakes so they face kind of upward, not perpendicular to the ground? That should help. Keep it in the fridge until right before serving too.
Lisa Marie Sandoval
June 27, 2012 at 12:36 pm (13 years ago)What a great page!! It’s nice to meet you through your site. I discovered it while searchiing for a place to send my readers. You are definitely a Yowling Creator!! My friend was inspired to embrace her culinary yowling and create a masterpiece that was more beautiful than my bridal bouquet. Check it out: A Yowling Creator’s Cupcake Bouquet” http://yowlingcreator.com/a-yowling-creators-cupcake-bouquet/
Lisa Marie Sandoval recently posted A Yowling Creator’s Cupcake Bouquet
Linda Campbell
July 1, 2012 at 8:06 am (13 years ago)I made a cupcake bouquet for my friend Lynn’s birthday this past week. It was a big hit. The only problem was the bouquet was so pretty no one wanted to take the cupcakes off and eat them . I posted pictures on my pintrest board. I wish you could see it but I don’t know how to get the photo to you other than you going to look for it on my pintrest account. Thank you for the inspiration.
Stephanie
July 1, 2012 at 11:01 am (13 years ago)@Linda – I’d love to see photos! Can you post them to my Facebook page?
Rose
July 5, 2012 at 6:31 am (13 years ago)Hi Steph this is a great tutorial
We made around 16 for a bridal shower a few
Years ago, and you may need to weight the bottom as the can be top heavy
We used old Christmas mugs with the handle broken off
Anna @ Crunchy Creamy Sweet
July 17, 2012 at 9:42 am (13 years ago)OMG! Seriously! How gorgeous and genius is this! Included in my Tuesday Links and Things post.
Anna @ Crunchy Creamy Sweet recently posted CCC Monday: Waffle Chocolate Chunk Cookies
Zoe
July 25, 2012 at 8:07 am (13 years ago)neat!! we’re always looking for fun new cake ideas for my daughter’s birthday. You could do cake pops in between the cupcake roses for additional interest in the bouquet too!
Heather m
July 27, 2012 at 3:49 pm (13 years ago)Love love love this!!!!!! Thanks for a great tutorial. Just what I need to cheer myself up with!!! 🙂
statelysweets
August 4, 2012 at 12:33 pm (13 years ago)I love this! Especially the cupcake roses! Also the instructioms are great!
Thx.
statelysweets
August 4, 2012 at 12:36 pm (13 years ago)I love these! Especially the cupcake roses. I found a pot almost identical to yours at Michaels. Thx!
statelysweets recently posted Fruit Smoothies
Natalie
August 13, 2012 at 2:56 pm (13 years ago)LOVE THIS! Will this last in a 2 hour car ride in LA heat??? How long do they actual stay up for?
Stephanie
August 13, 2012 at 9:31 pm (13 years ago)@Natalie – honestly, I’m not sure how it will last in a hot car for 2 hours. Frosting doesn’t hold up that well in heat so I’m afraid they might slide off. Maybe it would work if you freeze it briefly before you leave.
Lucia
August 14, 2012 at 10:51 am (13 years ago)What a great idea! Thanks for sharing it!! 🙂
Stephanie
August 14, 2012 at 8:13 pm (13 years ago)@Lucia – thanks! 🙂
Chelsea
August 17, 2012 at 8:30 pm (13 years ago)This is a fantastic idea! Definitely going to try this!
kareem
September 4, 2012 at 11:31 pm (13 years ago)i want to do this for a sick coworker but i need everything to be edible…suggestion
kareemtiheed@gmail.com
thank you
kareem recently posted this wife bakes: Oh so nice I had to post it TWICE: Red Velvet Cake…
Stephanie
September 6, 2012 at 11:33 am (13 years ago)@kareem – even the pot? I guess you could make a cake and carve it into that shape, then maybe cover it in fondant (or just frost it). Now you’ve got me thinking…I want to try that!
Chris Jackson
September 14, 2012 at 11:33 am (13 years ago)I use popsicle sticks cut down, holds the weight of the cupcakes much better.
Stephanie
September 14, 2012 at 11:34 am (13 years ago)@Chris – thanks for the great tip! I’ll try that next time.
M. Alexandria Yoong
October 2, 2012 at 12:53 am (12 years ago)Thanks for the great idea! And your tutorial was so clear! 🙂
M. Alexandria Yoong recently posted Grow-it-Yourself French Tarragon
Cool Cake
October 21, 2012 at 3:53 am (12 years ago)Those cupcakes are just breathtaking! Thanks for the comprehensive tutorial 🙂
Lauren
October 29, 2012 at 11:22 am (12 years ago)Do you know how big the pot was that you used?
Stephanie
October 29, 2012 at 2:02 pm (12 years ago)Lauren, it was fairly small – probably around 6 inches tall and 4 inches in diameter.
Frankie
November 1, 2012 at 11:39 am (12 years ago)What a great idea! As I read thru all the tips and comments that followed, I thought back to the leaves…For them I would make cookies in leaf shape to add that extra touch (and treat)
Barbara Wilson
November 4, 2012 at 4:09 pm (12 years ago)Thank you so much for this tutorial. Just practiced a bouquet for a baby shower I am catering with cupcakes next week (you can see it on Facebook if you go to our page–WorldCup(cakes) ). Used a pot and a 6in diameter ball which held 12 cakes. Any thoughts on how to transport these beauties?
Stephanie
November 5, 2012 at 5:06 pm (12 years ago)Barbara, I’d probably put it in a slightly larger box or baking pan and pad it a bunch. Or get someone to hold it for you if that’s an option! 🙂
Alessandra
November 8, 2012 at 10:51 pm (12 years ago)Hi, I found this on Pinterest, what a good idea :-). I’ll have a look at the rest of your blog now
Ciao
Alessandra
Alessandra recently posted Stuffed mushrooms (pity they shrink so much!), Taste magazine, and a story about quail eggs and great service
MIchelle
November 25, 2012 at 4:40 am (12 years ago)This is such a neat idea. I am making a cupcake tower for a surprise 60th birthday party. Normally on the top of the cupcake tower, I would have an 8″ layer cake, but the customer wanted a larger cake at table level….so I was looking for something to do for the top of the tower. This will be great! 🙂
Ashley
November 28, 2012 at 12:24 pm (12 years ago)I would maybe use baby’s breath or tulle squares to fill in the gaps!
Ashley
November 29, 2012 at 3:23 pm (12 years ago)I did a practice round and the icing was way to creamy, lumpy and not stiff enough to make a design. I let my kitchen aid mixer beat it a while. Suggestions?
Chella
January 10, 2013 at 5:36 pm (12 years ago)Thank You – such a cute idea and great instructions 🙂
sana
February 4, 2013 at 2:30 am (12 years ago)the instuctions were really clear
judy
May 9, 2015 at 11:42 am (10 years ago)Do not use butter in your icing if you want the taste of butter use butter flavoring in the icing
Louise
February 6, 2013 at 6:31 am (12 years ago)Love the idea … I tried but failed … Help … Bought mini cupcakes from my favorite bakery … Couldn’t Get the toothpicks thru the cupcake paper … So tried punching a hole in paper … Still problems, the cupcakes were getting smashed … What is the secret?
Stephanie Nuccitelli
February 7, 2013 at 3:45 pm (12 years ago)Louise, I use plain, thin paper cupcake liners and haven’t had any trouble piercing them with a toothpick. I’ve also heard of other people using popsicle sticks instead of toothpicks.
lisa vaughn
February 6, 2013 at 11:11 am (12 years ago)Thank you for posting such great instructions! Apparently I promised my dentist a batch of my daughters cupcakes while I was “under”. She is a wonderful baker and is looking forward to following through on my so deserved debt.
RachelH
February 7, 2013 at 3:35 pm (12 years ago)I tried this and it ended up in a total disaster two years ago on Mother’s Day. The cupcake liners could not be pierced by the toothpick. I ended up “smooshing” some of the cupcakes. I finally got a safety pin and pre-poked the holes in the liners where the toothpicks would go. It’s a nice and cute idea, but I will never attempt this again.
Stephanie Nuccitelli
February 7, 2013 at 3:50 pm (12 years ago)RachelH, I’m sorry to hear the toothpicks didn’t work for you. Some people have used popsicle sticks instead. I’ve never had an issue piercing my liners with toothpicks. For the bouquets, I always use thin paper liners (the pastel colored ones they have at the grocery store).
pamela
February 8, 2013 at 12:35 pm (12 years ago)la mejor explicacion del todas, buenisima pagina
Laura
February 11, 2013 at 2:26 am (12 years ago)Just wondering if you couoldnt get a hold of a styrofoam ball, can you suggest anything else to use please?
Janneke Meerman
February 13, 2013 at 2:12 am (12 years ago)Great how-to!! Shared it on my blog!!
zlati
March 23, 2013 at 8:03 am (12 years ago)This is absolutely stunning! Thank you! You are amazing ! I am totally making this for a birthday gift
Mary May
March 25, 2013 at 10:50 am (12 years ago)I love this idea and I’m planning on doing them for my niece’s wedding. As I have to transport them do you think it would be OK to mount them and then decorate in situ? Also instead of toothpicks, what about using double-sided sticky tabs? Thanks.
sheri
March 29, 2013 at 5:05 pm (12 years ago)Stephanie, you truly have a gift. Thanks, they were delicious!
Chelly Wood
March 31, 2013 at 8:39 pm (12 years ago)I run a website on Secret Pal ideas (like Secret Santa). I’d like to redirect my readers to this website for instructions to make this for Administrative Assistant day (April 24). Would you mind if I use your image of the final product to let them know how fantastic this product can look? As I said, I’ll be redirecting traffic to this site, for instructions on how to make it.
I’d like to post on April 4th so people have plenty of time to plan and make the project.
Chelly Wood recently posted Easter Gift-Giving Ideas for Your Secret Pal Teacher Friend
Stephanie Nuccitelli
April 1, 2013 at 11:40 am (12 years ago)I’ll send you an email, Chelly.
Julie
April 27, 2013 at 3:24 pm (12 years ago)These are adoreable! Did you use the mini cupcakes or regular sized?
Julie recently posted Molten Chocolate Skillet Brownie
Stephanie Nuccitelli
April 29, 2013 at 4:24 pm (12 years ago)Thanks Julie! I used regular sized cupcakes.
Ashleigh
April 29, 2013 at 7:16 pm (12 years ago)This was great! Very helpful and the videos were even more helpful!
I used a sharpie and personalized my flower pot and baked it in the oven. I also put yellow food coloring in my icing so I had soft yellow roses! They turned out beautiful! I wanted to upload photos, but i dont think we can by commenting…
Ashleigh recently posted Frozen Voskos Greek Yogurt
mizsmity
May 8, 2013 at 1:03 am (12 years ago)hey I can’t get my cupcakes along the bottom row to stay firmly on there… do they just balance or are yours really secure?? also a question about buttercream. if your butter is a bit to cold can it curdle when mixed with icing sugar??? ive made it a million times but just recently it keeps curdling and I just don’t no what’s going wrong 🙁 help !
Debbie @ Deliciously Inspired
May 11, 2013 at 5:57 am (12 years ago)This a an adorable idea. Can’t wait to try with next batch of cupcakes. Great tutorial. Thank you. Stopping by from Deliciously Inspired.
Shikha
May 14, 2013 at 5:25 am (12 years ago)Thank you Stephanie for the lovely tutorial. This was my inspiration for this Mothers Day 🙂 I love your blog .. thank you for sharing…
Crystal
May 19, 2013 at 3:02 pm (12 years ago)Loved your post here… Great ideas & pictures… Am so excited about making mine… in progress now… Have started my bouquet… using styrophom ball in a beautiful 8″ blue ceramic pot… put the 5″ plastic cups on with a large head screw to hold them secure… adding silver tissue paper between and will have the cupcakes be white… Matching my Granddaughter’s school colors for her celebration party next Saturday… Also adding a large wreath ring covered in blue crape paper with more cups attached on an angle for the pot to sit in the center… hoping it turns out the way I see it in my mind… Thanks for the wonderful Ideas you share… Enjoy!!!
Debbie
June 4, 2013 at 6:31 pm (12 years ago)Love the Cupcake Bouquet !!! Can’t wait to try this project out with my Grand-daughter that wants to learn how to bake cupcakes. So our project will be for Fathers and just hope they turn out as good as yours. Thanks for the wonderful blog. 🙂
Lily-Mae Andrew
June 21, 2013 at 2:14 pm (12 years ago)What a beautiful bouquet and a fantastic idea. I have a friends birthday coming up and was looking for something a bit different. I think this will fit the bill nicely. Thank you very much.
Lily-Mae Andrew recently posted Healthy Breakfast Meals
Lynda Shaw
June 28, 2013 at 5:32 am (12 years ago)Thank you so much for posting the details – I’ve been through a thousand pictures, with no details, trying to figure out what size flower pot / styrofoam ball I need for the amount of cupcakes I need!! This is adorable!
Diane Coates
July 15, 2013 at 12:54 pm (12 years ago)I absolutely love this! How creative! There are clearly more cupcakes on the link I saw on FB than there are on the “rose bouquet”. Did you make miniature ones for the other? Thanks!
Diane Coates
July 15, 2013 at 1:13 pm (12 years ago)Love this idea, thanks for sharing!! It looks as though the bouquet seen on my feed on FB has many more cupcakes than the rose bouquet. Did you use miniature pans? Thanks!
Annie
July 21, 2013 at 7:44 pm (12 years ago)I’ve done this with extra green cupcake liners as the leaves! just bunch them up at the bottom like you did the tissue paper – they already have a little texture. I love the pot you used! I used a decorative flower pot that my mom continues to use today since I made this bouquet for her a couple years ago. Great tutorial! Thanks!
MiniBooger
July 25, 2013 at 10:18 am (12 years ago)You note tape is required in the materials list, but it is not mentioned in the tutorial. What is it used for?
MiniBooger
July 25, 2013 at 10:24 am (12 years ago)Nevermind! I see it now 😛
MiniBooger recently posted Retro Dishmop
Bonnie Watkins
July 28, 2013 at 6:05 pm (12 years ago)I love things different and this is really diffferent. I am going try to do this bouquet of roes cupcakes thanks for the ideal
Stephanie Heaphy
July 31, 2013 at 1:59 am (12 years ago)How darn cute! Can you put food coloring in them?
Stephanie Nuccitelli
July 31, 2013 at 10:41 am (12 years ago)Thanks Stephanie! Do you mean to color the frosting? Absolutely! You can use food coloring in the frosting. I also used beet juice to color this frosting pink (you can’t taste it at all).
cynthia jones
August 13, 2013 at 6:48 am (12 years ago)hi are you using regular cupcake papers or mini? I have flower pot and ball and I don’t see how you ca get 10 cupcakes on this ball. Please respond back to me thank you
Stephanie Nuccitelli
August 13, 2013 at 9:22 am (12 years ago)Cynthia, these are regular sized cupcakes. You can use mini ones if your flower pot and ball are too small to hold regular cupcakes.
Denise Noel
August 24, 2013 at 12:13 pm (12 years ago)I used Babies Breath and other real greenery. The greenery was tall enough…it doesn’t affect the rose frosting!
Denise Noel
August 24, 2013 at 12:16 pm (12 years ago)I used real greenery and babies breath. The greenery was high enough it didn’t harm the rose frosting.
Carries
September 2, 2013 at 7:59 am (12 years ago)Love it! Thanks!
cool4ideas.blogspot.com
Debbie
September 3, 2013 at 12:22 pm (12 years ago)What size pot, ball and cupcake?
Stephanie Nuccitelli
September 3, 2013 at 9:03 pm (12 years ago)Hi Debbie, these are regular sized cupcakes. I fit around 10 on a ball and pot with 5″ diameter. Someone else commented that fit 12 cupcakes on a pot and a 6in diameter ball.
Karen Bower
September 16, 2013 at 10:55 am (12 years ago)Where does one purchase a vanilla bean? And did you need to use something heavy under the Styrofoam in the pot so it doesn’t tip over?
Stephanie Nuccitelli
September 21, 2013 at 1:55 pm (12 years ago)Karen, I didn’t use anything to weight the pot down, but it couldn’t hurt. I used vanilla extract in this frosting, but I recommend vanilla bean paste for a great vanilla buttercream (it just has black flecks in it).
Animationmu
October 6, 2013 at 1:44 am (11 years ago)What a nice guide, thx a lot.
Connie
October 14, 2013 at 8:01 pm (11 years ago)I made one for my mom’ birthday and it was met with rave reviews. Thanks for the great idea. I used gel coloring in my piping bag and created a two-toned look for my roses. I was wondering for your buttercream, did you use a one to one ratio for the vanilla extract to the vanilla bean paste? I need my buttercream to not have flecks in it.
Stephanie Nuccitelli
October 15, 2013 at 9:16 pm (11 years ago)Connie, so glad you enjoyed it! Yes, I used about the same amount of vanilla extract. Taste the frosting and add more if needed.
Ugochi
January 17, 2014 at 6:28 am (11 years ago)This is so amazing! I will bookmark for a try out.
Congratulations on your feature day on SITS, do have a super blessed day!
Love
Ugochi recently posted For Peace Sake
karen
January 17, 2014 at 6:33 am (11 years ago)wow…what a talent…I’m jealous since I am a horrible baker.
karen recently posted I Barely Escaped
Pam
January 17, 2014 at 6:34 am (11 years ago)That is absolutely wonderful. I have never seen one of these! I’m a big cupcake fan (cake is literally my favorite food…), so this whole idea is perfect. I think I’ll make one of these for my inlaws for their anniversary. Happy SITS day!
Pam recently posted 2013-A Very Strange Year
Christina
January 17, 2014 at 7:20 am (11 years ago)This is such a cute idea and so easy to do as well. What a great gift or decoration for any occasion.
Christina recently posted The Delicious Life
Martha
January 17, 2014 at 8:23 am (11 years ago)This is so cute! I will be Pinning this for Mother’s Day.
Martha recently posted Seven ways to grow your blog, part five: Use your social media networks wisely
Bev
January 17, 2014 at 9:26 am (11 years ago)That is absolutely gorgeous! I think that would make a beautiful centerpiece for a bridal or baby shower. Happy SITS day!
Bev recently posted My Top 5 Intentions for 2014
Beth @ Goodness Gracious Living
January 17, 2014 at 11:00 am (11 years ago)Fabulous Stephanie! I think I have the “how to frost a rose cake” pinned already, the video looked so familiar. I noticed that you don’t use a coupler on your bag, just the tip inside with the bag trimmed. How does the frosting not pop out past the tip? Stopping by from SITS so have a great day!
Beth @ Goodness Gracious Living recently posted How To De-Seed A Pomegranate In Honor of Tu B’Shevat
Hatton
January 17, 2014 at 1:12 pm (11 years ago)HOW PRETTY!! That is such a cute bouquet.
How did you create that cool video in the middle that automatically plays????
marie
January 17, 2014 at 3:15 pm (11 years ago)beautiful! love the perfect roses.
Marie @ In Our Happy Place
marie recently posted instafriday & simple valentine heart cookies
Clotilde/Craftybegonia
January 18, 2014 at 7:06 pm (11 years ago)Hi, I’m visiting you from The SITS Girls. That cupcake bouquet is such a precious idea! Thanks for sharing.
Heidi @simplerecipebox
January 20, 2014 at 12:38 pm (11 years ago)Hey, visiting from SITS Girls as well. This is a beautifully done tutorial! You and I are opposites I think, I love to cook but I’m not much of a baker 🙂 If I was, I would definitely be trying this out. Beautiful!
Heidi @simplerecipebox recently posted Why Being Healthy Is Over-rated
libby a.
February 9, 2014 at 8:14 am (11 years ago)Best tutorial setup! Animated gif for the roses was a nice touch. Thanks for taking the time to share! Kudos!
Stephanie Saunders
February 9, 2014 at 9:39 am (11 years ago)Thanks Libby! So glad you enjoyed my tutorial! 🙂
Amina
February 10, 2014 at 11:27 pm (11 years ago)Great idea. Love the neatness of your bouquet. I wanna try this for valentines but too risky I suppose. I’d never get the angle right , which you mentioned is so important, and I’m gonna make cream cheese frosting for my cupcakes, so not sure if it will hold up.
But great attempt. You are so skilled to pull it off like that!
Stephanie Saunders
February 11, 2014 at 9:02 am (11 years ago)Thanks Amina! You can always just make rose cupcakes for Valentine’s Day if you’re afraid of putting together a bouquet without practicing first.
lakshmi sreenaty
February 15, 2014 at 6:39 am (11 years ago)Innovative…!
Leah
March 11, 2014 at 8:47 pm (11 years ago)Thank you so much for this great idea! I made this for my brother’s birthday and everyone loved it! The only thing I did differently to help support the cupcakes is I stuck a toothpick straight through the cupcake once it was already on the other ones to keep it in place!
Tricia
March 30, 2014 at 11:34 am (11 years ago)These are beautiful. I have some friend’s birthdays coming up that I want to make these for but have a few questions: 1. Have you tried the popsicle stick idea yet, and if so, did you feel it held the cupcakes up better than toothpicks? 2. I would need to assemble this the night before, and I’m worried about the weight of the bottom cupcakes making them fall off the toothpicks/popsicle sticks after a few hours….is that really an issue? Thank you.
Tricia
March 30, 2014 at 4:17 pm (11 years ago)This is beautiful. I just have 2 questions. 1. Have you tried the popsicle stick idea and did you find that works better than toothpicks? 2. I would need to assemble this the night before delivering it…would the weight of the bottom cupcakes be too much and make them fall off the toothpicks/popsicle sticks after that amount of time? Thank you.
Stephanie Saunders
March 30, 2014 at 7:46 pm (11 years ago)Tricia, popsicle sticks and toothpicks both work, as do lollipop sticks. I would assemble as close to the event as possible. The bottom cupcakes do sometimes fall off if you leave the bouquet assembled for hours. Good luck! 🙂
Madeleine
May 7, 2014 at 11:30 am (11 years ago)What size flower pot did you use?
Madeleine recently posted How to Make a Mimosa Bar in 3 Steps
Jolene Peek
June 24, 2014 at 10:52 am (11 years ago)I’m love the cup cake boquets tutorial! I’m can’t wait to try it!
Allie @ Peachfully Chic
May 6, 2015 at 6:46 am (10 years ago)Great idea! In addition to running my lifestyle blog, Peachfully Chic, I’m also the DIY Editor at CraftBoxGirls.com and each week I feature someone else’s inspirational DIY project. Today I featured this tutorial as an awesome Mother’s Day Gift idea and wanted to let you know that we shared your photo and linked back to this page! If you are ever interested in writing a guest post similar to the style that I featured this bouquet tutorial, shoot me a note. We love working with other bloggers!!! xo
Here’s the link if you would like to see the post referencing your tutorial on Craft Box Girls: http://www.craftboxgirls.com/post/diy-mothers-day-cupcake-bouquet.html
nancy
May 10, 2015 at 9:41 am (10 years ago)I made the cupcake bouquet for my niece for Mother’s Day – she is expecting in August! She loved it!!!
Luticia Minter
January 27, 2016 at 9:57 am (9 years ago)We are auditioning ideas for a wedding in April, last night hubby had the idea to use a honeydew melon instead of Styrofoam ball, this took care of the top heavy cupcakes. we used an awl to use for the skewers. Still trying to decide if this is the display we want to use.
Julia
April 22, 2016 at 10:22 pm (9 years ago)You could use real leaves by putting one under plastic film and coat them in colored chocolate. Place in freezer for 20 minutes or till firm and peel off leaf. Very fragile but worth the effect t.
Lea
May 8, 2016 at 7:27 am (9 years ago)Thanks…this is just what I needed!
Alessio Loi
September 16, 2016 at 10:03 am (9 years ago)Il polistirolo non è usato solo per l’abbellimento delle torte, ma anche per il rivestimento delle pareti, un uso intelligente del polistirolo consente di risparmiare tempo ed essere creativi.
Denise
February 13, 2017 at 11:35 am (8 years ago)Poxa vida, eu fico muito feliz por você e outros estarem comentando no meu blog, e obrigado pela avaliação do
vídeo Edvaldo, Grande Abraço e Sucesso pra ti também!
Denise recently posted Denise
Amalfi
August 1, 2017 at 9:33 am (8 years ago)So cute! Beautiful like a bouquet but also edible. Best of both worlds. I love your tip about using the tissue paper as filler and the ‘leaves’. I wondered how the weight would hold up with cupcakes that are placed on the sides and this tissue paper will help hold some of that weight up while finishing the look. Thanks!
Theresa
August 26, 2017 at 10:31 am (8 years ago)Can this be made with deli/store bought cupcakes? Will the icing hold??
Scarlet | Family Focus Blog
February 7, 2020 at 12:32 pm (5 years ago)That is so super cute! I want that cupcake bouquet for Valentine’s Day!
Norma
November 8, 2020 at 1:45 pm (4 years ago)I’m wondering if putting a ring of the “leaves” at the bottom of the ball first would help support the cupcakes on the bottom?
Ashley
March 13, 2021 at 4:19 am (4 years ago)Thank you for sharing the instructions to this wonderful gift. I’m going to have a go at this today for a Mother’s Day gift tomorrow xxx
Matt Cook
September 13, 2021 at 1:52 am (4 years ago)Thanks for explaining the step photo tutorial to make a cupcake bouquet.
Rugs
October 11, 2021 at 3:55 am (3 years ago)I love your bouquet! Mint leaves are a great idea! I’ll have to try those too.
markhurst
October 13, 2021 at 1:44 am (3 years ago)Lovely Cupcake Bouquet